We start discussing Southwest region landforms the same way as we did with our other concepts, with a concept map.
U.S. Regions Concept Maps
 Then just as before, we read the text with our "lens" of finding landforms.
However this time, I urge students to spend more time looking at the text features rather than reading every single paragraph over again.
For one thing, the maps are going to give a lot of information. Additionally, the headings are going to help us remember what the sections are about. A heading that reads, "A proud people" is probably not going to have as much information about Southwest region landforms as a heading that reads, "A lay of the land."
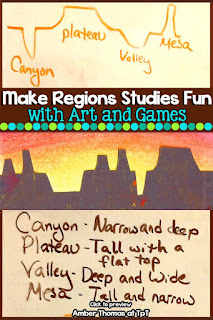
We do play our "Beat the Teacher" review game that I described in an earlier post to emphasize the key terms I want students to know for the test. And when it comes to the region we're familiar with, here in the Northeast, this is as far as I go. But today I want to skip ahead a few months to talk about what happens when we cover terrain that is unfamiliar to students. Growing up in a city in Massachusetts, my students are not familiar with Southwest region landforms like canyons, mesas, or plateaus. So to help these terms stick and give students the "other worldly-ness" feeling of a new landscape, we make art!
Southwest Region Landforms Art
This art project is one of the highlights of our Southwest Region Unit. I've tried a variety of media to create this project, but the key is always holding the page lengthwise, hand drawing a straight line, for the horizon, drawing the shapes, (canyons, plateaus, mesas and valleys) then cutting along that single, jagged line. These two havles result in TWO "jigsaws" and helps students see the inverse relationship between the canyons and plateaus, valleys and mountains. This will tie in with our science unit on weathering later on, but that's a blog post for another time.
Another method for creating our landscapes with the Southwest region landforms is to prepare the page BEFORE drawing out the shapes. I provide thinly cut strips of paper (think 1/8 inch) for students to glue in rows. They draw on the back and once cut, they glue it onto blue paper for a sky color.
The advantages of this method are easily accessible materials as well as opening the door to discussions of visible layers of sedimentary rock (and more science connections).
 The major disadvantage to this project is that for some students, cutting through two layers of construction paper and glue is an arduous task, especially when they have to cut along that whole line with no natural breaks.
Another method is to use chalk pastels (affiliate link). First, rub the lightest color on the jigsaw. Hold it firmly against the background and rub UPWARDS.
 What happens is the colored pastel dust you brushed up becomes the sky, and the area that the jigsaw was covering stays the original color of the paper (so brown is a good choice). Next, choose a second color that is lighter than the first.Rub it on the jigsaw, then hold it firmly a little higher up than the first. Rub upwards again, and you get another layer of Southwest region landforms in the distance.
As you can guess, this project requires a steady hand when it comes to rubbing the color upwards, because you can't erase (but you can save the jigsaw for a second attempt). And of course, you really can't substitute those chalks for crayons or oils because you need the dust for it to work.
The final method is my personal favorite because it seems to have the highest success rate, and it looks really dramatic.
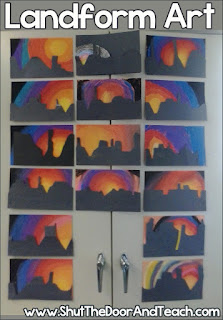
Southwest Region Landforms Displays

The medium is oil pastels on black paper. I demonstrate how to create a sunset, with concentric circles and colors. If you think of the order of colors in a rainbow, ROYGBIV, reverse the letters in ROY's first name to YOR. Then reverse the rest of the letters of his last name to VIB. Finally, omit that middle initial. There's no green in this sunset. I allow students to include pink as well. Depending on the hue (peachy or fushia), it looks best either between the orange and red or red and violet.
Notice that it's not necessary to complete the underside of the circle, but more than halfway ensures there's no missing coverage later on.
After the colors are on the page, use a tissue to rub along the edge of each circle. This will help them blend. Do NOT use fingers for this step! Not only do the pigments stain, but the oils from your fingers can cause black/grey discoloration on the artwork.
 Finish by laying a black jigsaw of the landscape over the top. The result looks like a landscape with the Southwest region landforms in silhouette.
Could you use crayons for this project to avoid mess? Absolutely! If you notice on my filing cabinet (top, middle) there was one absent student who completed the project using crayons. The materials are up to you. You could also probably have success using watercolors. But if you want to get oil pastels for this project you can use my affliate link.
Bonus Project!
There's one more project I love doing when teaching the southwest region when we have extra time. I love creating sand art scenes! The one I did here as a sample includes local landforms (mountains) flora (cacti) as well as a Spanish style mission.
To create this project:
1. Start with a line drawing so you see large sections where you want your blocks of color to go.
2. Spread glue in all the areas you want purple.
3. Spread purple sand over those gluey shapes.
4. Repeat steps 2 and 3 for red, then orange, then green, and lastly yellow. Most of the colors layer very well using this system.
Notice that you can get different effects with how you spread the glue:
1. The grasses were formed with defined vertical lines of glue.
2. Conversely, the yellow ground is done with an even distribution of glue and results in blocks of color.
3. Colors can be blended if you pour a second color sand on top of an area where they glue is still wet (like the mountains).
4. On the other hand, if you want to isolate a color (such as the green cacti) wait until the rest of the glue is dry before spreading glue in the areas to be filled in with green.
 If you need some for this project, you can get colored sand here (affiliate link).
  Have you tried any of these art techniques with your fourth graders? Have you tried them in the context of social studies? You'll find these art projects as well as more traditional note taking practice and worksheets in my Southeast Region Unit.


